Week 4 - Week 7

24May 2025 - 18June2025
Project 2A - Walk Cycle
Then I imported the image into Adobe Animate as a rough draft and
created the bottom line to represent the ground, and the cyan line
above was to determine the walking range of the character.
I moved each action to one screen.
According to the feedback from the teacher last time, I paid special
attention to the continuity of the character's feet this time.

QIULIHUA/0365036
Animation Fundamentals / Bachelor of Design (Honours)in Creative Media
Project 2——Animation Fundamentals
INSTRUCTION
LECTURE
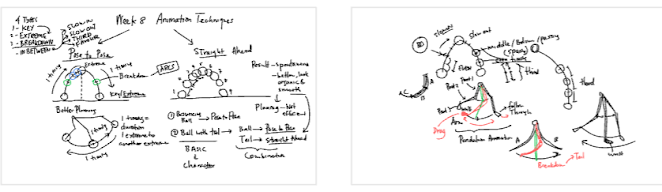
week 8:
1. Two traditional animation techniques
Pose to Pose
The animator first draws the key frames (Key Poses), and then gradually
adds transition frames (in-betweens).
Advantages: easy to plan and control rhythm and action structure.
Keywords:
- Key
- Extreme
- Breakdown
- In-between
- Straight Ahead
Drawing one frame at a time from the starting point of the action makes
the action more natural, smooth and dynamic.
Disadvantages: It is difficult to control the volume and rhythm, and it
is not easy to modify.
2. Animation rhythm and tailing action principle
▶ Follow Through
After the main body of the action stops, the attached parts (such as
tail, hair) stop with a delay, creating a sense of reality.
Example: The tail and cape continue to move after the main body stops.
▶ Overlapping Action
Different parts of the body start and stop at different times, creating
natural delays and flexibility.
3. Pendulum Animation
Shows how to simulate natural shaking: arms swinging, tail trailing.
The action draws an "arc" and follows the inertia of gravity.
Observe the "tail delay" and "segment delay" of the swing.
Project 2A - Walk Cycle
1. Create a project in Adobe Animate. Set the setting as 24fps, 16:9
aspect ratio with 1280 x 720 (HD720p) resolution.
3. Using the same character that you did in Project 1, animate the
rough animation of that character, walking in the same spot at the side
view. The rough animation process should be using basic form and
sketchy stroke.
4. The animation should show the quality of being appealing, fluid and
flexible which you have mastered in the previous exercises.
Output the rough animation as video with any of these format, *.mp4
format or quicktime *.mov.
Before this, I watched the walking animation examples that the
teacher gave us, and found that the walking height of the characters
was not kept at the same level. The walking posture of the person
changed the walking height of the character, so that the animation
drawn could be more vivid.

|
| Fig 1.0 example video |
In order to better reflect the character's walking animation, I
first drew a draft of each frame of the action on Photoshop.

|
| Fig 1.1 Walk Cycle Draft |

|
| Fig 1.2 Walk Cycle Draft |
I moved each action to one screen.
Walk Cycle:
During class, the teacher checked our homework. He asked me to delete
the extra action frames and only keep a few walking frames. He also
showed me how to lift the toes when the character walks and pointed
out our mistakes. The character's feet need to be connected according
to the different actions of each frame, so that the animation will be
more coherent.
I modified my exercises based on the feedback from the teacher.

|
| Fig1.3 Walk Cycle process |
Walk Cycle Draft:
Walk Cycle Line Art:
Walk Cycle :
PROJECT 2B: JUMP ANIMATION
- Create a project in Adobe Animate. Set the setting as 24fps, 16:9 aspect ratio with 1280 x 720 (HD720p) resolution.
- Using the same character that you did in Project 1 (Progression 1), animate the rough animation of that character’s jump animation
- The animation should show the quality of being appealing, fluid and flexible which you have mastered in the previous exercises.
- Output the rough animation as video with any of these format, *.mp4 format or quicktime *.mov.
- Create tie down drawing using a cleaner stroke.
- Output the Tie Down animation as video with any of these format, *.mp4 format or quicktime *.mov.
First, I drew a rough draft of the character jumping to determine
the shape and approximate position of the character.

|
| Fig1.4 jump animation process |
After finalizing the rough draft, I started drawing the characters I
would use in Project 1.

|
| Fig1.5 jump animation process |
JUMP ANIMATION DRAFT:
JUMP ANIMATION :
FEEDBACK
week 9:
General Feedback: The teacher thinks that my walking animation needs to be modified
Specific Feedback:When the character walks, the feet are not flat. In certain walking movements, the feet are bent and supportive. You don't need to draw too many movements in your walking animation. These are redundant. Just keep the important movements. Also, the character's feet should be connected together, so that the animation is more coherent.
Comments
Post a Comment